555 Timing 555 Triggering |
How does it Work? |
Examples:
|

| |||
|
| |||
| DESCRIPTION | |||
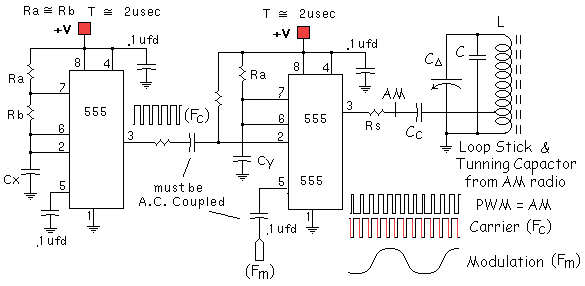
| AM
Transmitter "Click
Me" | |||
| |||
|
| ||
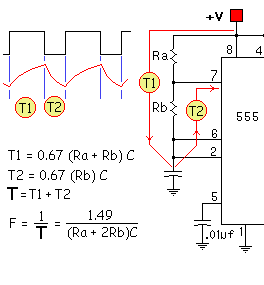
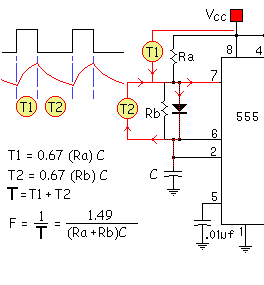
| The 555 monolithic timing circuit is
a highly stable device, that can act either as a time delay generator
(Monostable/one-shot), a Pulse-Width-Modulator (PWM), a RC Oscillator, or
a Voltage Controlled Oscillator (VCO). In the time delay mode of operation, the time is precisely controlled by one external resistor and one external capacitor. For a stable operation as an oscillator, the free running frequency and the duty cycle are both accurately controlled with two external resistors and one external capacitor. The circuit may be triggered and
reset on falling waveforms (trigger, Reset), and the output can source or
sink up to 200mA.
|
|
| ||
| ||
| 5) Don't be shy about using
several NEW parts--you could have a BAD PART(s)!
This includes resistors and CAPACITORS. ** DO NOT use electrolytics for the timing caps (if at all possible)! 6) Check the DATA SHEET, you may be
using a resistor for Ra or Rb that 7) Pin 5--the Voltage Control pin
of a 555 timer must be A.C. coupled! 8) When troubleshooting, remember more than 80% of all problems could have been found using your EYES! "--gee, I didn't see that the power cord was out of the wall..." 9) To get the best performance from the 555 in question, use the highest allowable supply voltage--15Volts--the timing capacitor should be in the picofarads and the "R" the very minimum value: you should get better than 500 kHz to ~2MHz. 10) Bypass the device and use groundplanes---***NO PROTO_BOARD!!!
| ||
|
Prototyping, R.F., Layout, Bypassing, Decoupling, Shielding, EMC, | ||
|
** MORE SUGGESTIONS: **
1) BYPASS pin 8 (Vcc) to 1 (grd.) with at least .1 ufd ceramic cap--shortest leads possible!!! 2) Use the smallest timing capacitor--pins 6&2 to grd. 3) Try different 555 chips, and/or
different manufacturers 555s they vary!
| ||
| Finally, Don't hesitate to "PLAY"--to experiment with this device; the 555 timer has many uses--some yet to be discovered; who knows you may be the one to find even more uses for it. |
|
| |
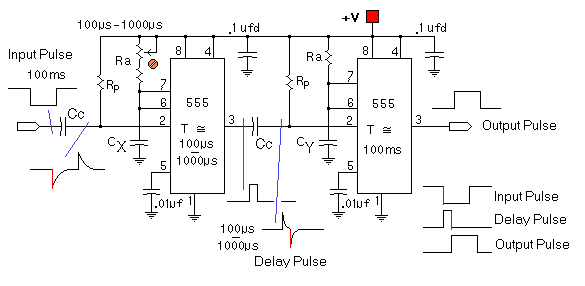 |
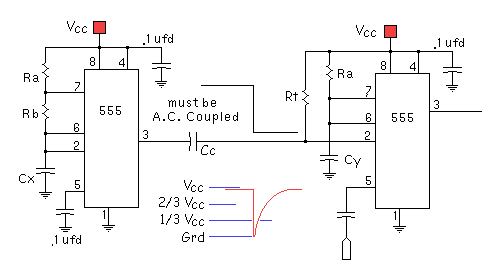
Triggering a 555 requires that the "Trigger"
input be A.C. coupled. Typical values can be found in the 555' data sheet
& app notes. However, some values:
Rp = 10k, Cc = .001ufd. |
 |
|
|
|
|
| The timer receives pulses from the distributor points. Meter M receives a calibrated current thru R 6 when the timer output is high. After time-out, the meter receives no current for that part of the duty cycle. Integration of the variable duty cycle by the meter movement provides a visible indication of engine speed . | |
 |
|
|
| ||
 |
| |
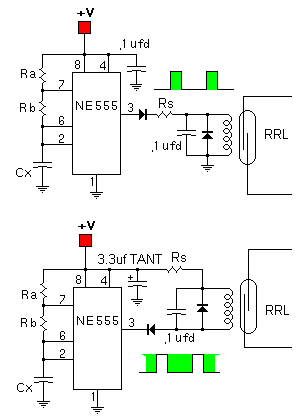
| Waveform: Green indicates Energized | ||
![]()
Under Construction in Perpetuity ![]() Web Author: Glen A. Williamson gaw@eos.ncsu.edu
Web Author: Glen A. Williamson gaw@eos.ncsu.edu![]()
Suggestions are Solicited, P l e a s e !